
 oleavr
多年来,我一直梦想着让 Frida 超越用户空间软件,把插桩能力扩展到操作系统内核和裸机系统,甚至微控制器……
微控制器
今年早些时候,我家的猫门坏了。与零售商沟通并反复检查安装等问题后,它每次只能正常工作一小会儿,最终还是会再次故障。
这显然让家里的猫很不开心:

它们自然会闹出很大动静,而我不得不起床手动放它们进来,也就很难睡个好觉。
最后我又买了一扇猫门,果然再也没出问题。旧猫门吃灰了一阵子,但我一直在想:能不能调试它,甚至扩展它的软件,让它做更多有用的事情。
我越来越想拆开它研究里面的电子元件,最终还是动手了:
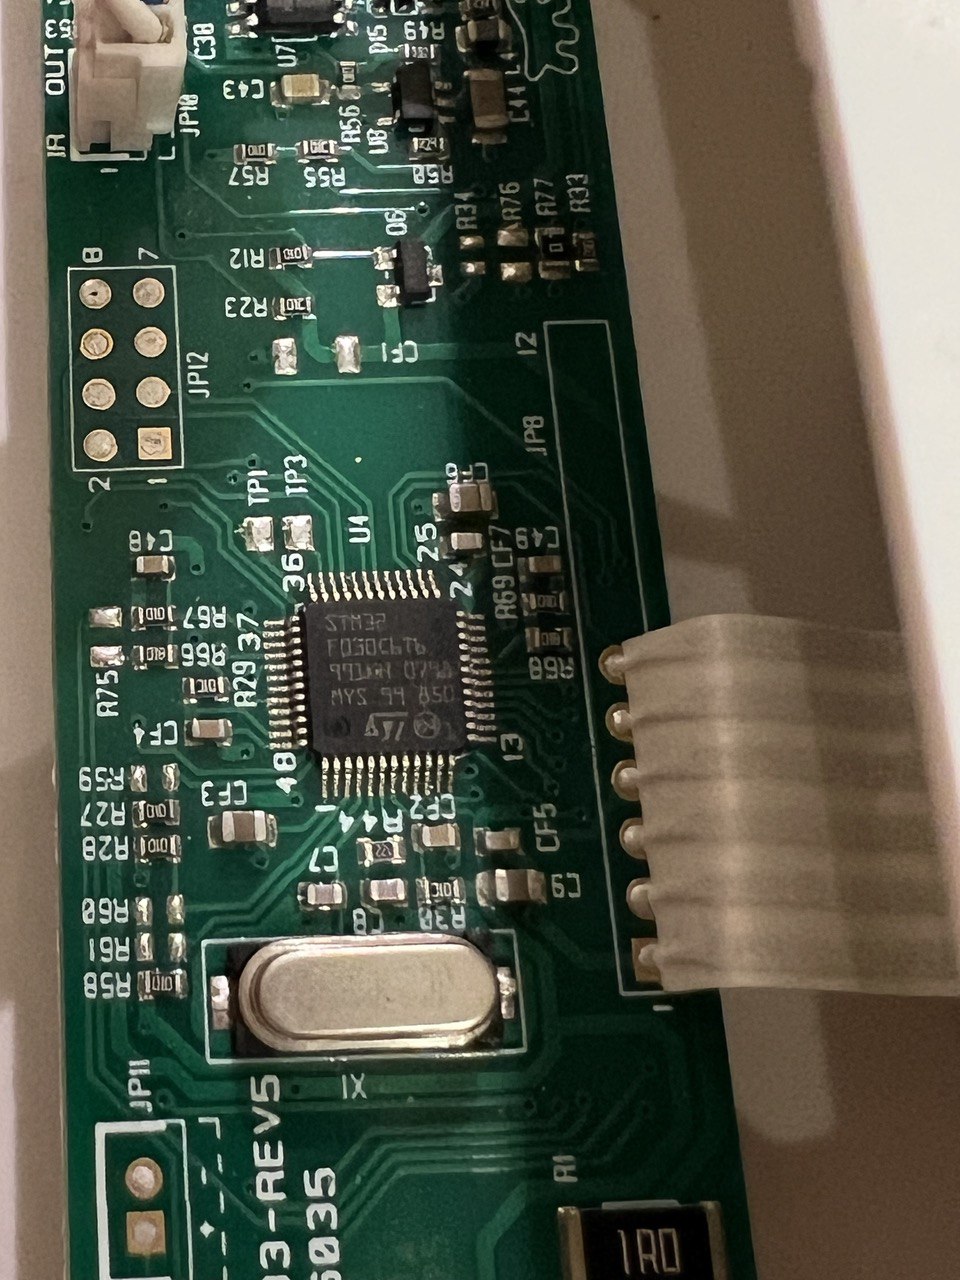
看起来这是 STM32F030C6T6,一款基于 ARM Cortex M0 的 MCU。我的第一个念头是能否转储闪存,再做静态分析。
快速浏览 MCU 文档并用万用表做了一番探测后,我弄清了 JP12 焊盘的定义:
| PAD 1/2 | PAD 7/8 | ||
|---|---|---|---|
| BOOT0 | USART1 RX | SWDIO | GND |
| VDD | USART1 TX | SWCLK |
这样就能轻松将 BOOT0 拉高,让 MCU 启动其内部引导程序,而不是用户代码。
将 USB 转 3.3V TTL 设备接到 USART1 焊盘后,我就能转储闪存:
$ ./stm32flash -r firmware.bin /dev/ttyUSB0
stm32flash 0.7

http://stm32flash.sourceforge.net/

Interface serial_posix: 57600 8E1
Version      : 0x31
Option 1     : 0x00
Option 2     : 0x00
Device ID    : 0x0444 (STM32F03xx4/6)
- RAM        : Up to 4KiB  (2048b reserved by bootloader)
- Flash      : Up to 32KiB (size first sector: 4x1024)
- Option bytes  : 16b
- System memory : 3KiB
Memory read
Read address 0x08008000 (100.00%) Done.
然后进行一些静态分析:
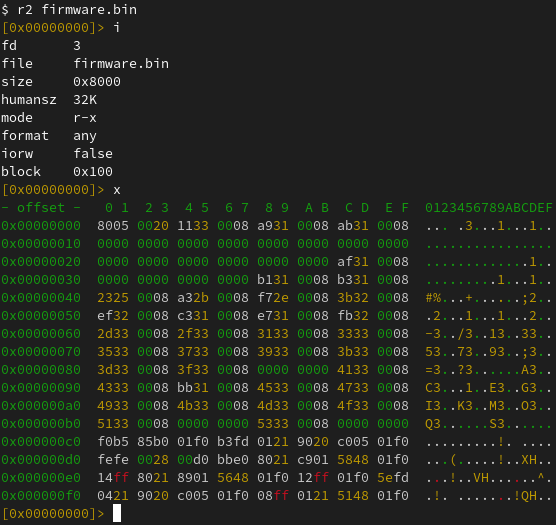
另外两个焊盘连接到串行线调试(SWD)所用的 SWDIO 和 SWCLK,所以下一步自然是接上 Raspberry Pi Debug Probe。配置完成后,我启动了 OpenOCD:
$ openocd -f interface/cmsis-dap.cfg -f target/stm32f0x.cfg
Open On-Chip Debugger 0.11.0-g8e3c38f7-dirty (2023-05-05-14:25)
Licensed under GNU GPL v2
For bug reports, read
	http://openocd.org/doc/doxygen/bugs.html
Info : auto-selecting first available session transport "swd". To override use 'transport select <transport>'.
Info : Listening on port 6666 for tcl connections
Info : Listening on port 4444 for telnet connections
Info : Using CMSIS-DAPv2 interface with VID:PID=0x2e8a:0x000c, serial=E6614103E78B482F
Info : CMSIS-DAP: SWD  Supported
Info : CMSIS-DAP: FW Version = 2.0.0
Info : CMSIS-DAP: Interface Initialised (SWD)
Info : SWCLK/TCK = 0 SWDIO/TMS = 0 TDI = 0 TDO = 0 nTRST = 0 nRESET = 0
Info : CMSIS-DAP: Interface ready
Info : clock speed 1000 kHz
Info : SWD DPIDR 0x0bb11477
Info : stm32f0x.cpu: hardware has 4 breakpoints, 2 watchpoints
Info : starting gdb server for stm32f0x.cpu on 3333
Info : Listening on port 3333 for gdb connections
我酝酿已久的想法是为 Frida 增加一个新后端,其中唯一可附加的进程是 PID 0。加载到其中的脚本实际上在本地运行,并实现大家熟悉的 JavaScript API。任何访问内存的 API,例如用 ptr(‘0x80000’).readInt() 解引用 int *,最终都会查询目标;在上述场景中就是通过 SWD 完成。
起初我设想让后端通过 telnet 接口与 OpenOCD 守护进程通信,但很快意识到,与其兼容 GDB 的远程桩通信更好。这样,Frida 就能对任何提供远程桩的目标进行插桩,无论是 OpenOCD、Corellium(iOS 内核插桩!)、QEMU,还是其他环境。
至于 Interceptor,我计划用断点实现基础功能,但仅在用户提供 JavaScript 回调时如此。如果提供的是函数指针,则可以执行内联 Hook,使目标运行时无需与主机之间反复触发陷阱和往返通信。这意味着它甚至可用于观察和修改操作系统内核或 MCU 固件中的热点代码。
完成初步实现后,我已经能运行下面的脚本:
Interceptor.breakpointKind = 'hard';

const THUMB_BIT = 1;

const initRest = ptr('0x0800306a').or(THUMB_BIT);
Interceptor.attach(initRest, {
  onEnter(args) {
    console.log('>>> init_rest()',
        JSON.stringify(this.context, null, 2));
  },
  onLeave(retval) {
    console.log(`<<< init_rest() retval=${retval}`);
  }
});
通过 Frida REPL 运行:
$ frida -D barebone -p 0 -l demo.js
     ____
    / _  |   Frida 16.1.0 - A world-class dynamic instrumentation toolkit
   | (_| |
    > _  |   Commands:
   /_/ |_|       help      -> Displays the help system
   . . . .       object?   -> Display information about 'object'
   . . . .       exit/quit -> Exit
   . . . .
   . . . .   More info at https://frida.re/docs/home/
   . . . .
   . . . .   Connected to GDB Remote Stub (id=barebone)

[Remote::SystemSession ]-> $gdb.continue()
[Remote::SystemSession ]-> >>> init_rest() {
  "r7": "0xffffffff",
  "pc": "0x800306a",
  "r8": "0xffffffff",
  "xPSR": "0x41000000",
  "r9": "0xffffffff",
  "sp": "0x20000578",
  "r0": "0x0",
  "r10": "0xffffffff",
  "lr": "0x8003069",
  "r1": "0x40021008",
  "r11": "0xffffffff",
  "r2": "0xffffffff",
  "r12": "0xffffffff",
  "r3": "0xffffffff",
  "r4": "0xffffffff",
  "r5": "0xffffffff",
  "r6": "0xffffffff"
}
<<< init_rest() retval=0x1
这里有几点需要注意:
- 我们将 Interceptor.breakpointKind 设为 hard,因为目标代码位于闪存中,软件断点无法工作。如果使用 J-Link 或类似 SWD 接口,则不必这样做;它们会在添加软件断点时透明地重新刷写闪存。
- 后端尚不会自动恢复运行,因此我们通过 $gdb.continue() 手动恢复。它属于这个内部 API,将 GDB.Client 的大部分能力暴露给 JavaScript。随着新后端逐渐成熟,这会成为内部实现细节;目前不应把它视为稳定 API。
- 我们设置最低有效位,告诉 Interceptor 目标函数采用 Thumb 指令编码。若你曾在 32 位 ARM 上使用 Frida 的传统后端,应该已经熟悉这一点。
- 新的 Barebone 后端默认连接 127.0.0.1:3333 上兼容 GDB 的远程桩,这与 OpenOCD 的常见默认值一致;也可通过 FRIDA_BAREBONE_ADDRESS 环境变量覆盖。
操作系统内核
有趣的猫门支线任务很适合测试规模较小的一端,但支持更大型系统同样潜力巨大。
其中最酷的用例之一无疑是 Corellium,因为这意味着我们可以对 iOS 内核插桩。借助 Tamarin Cable,甚至应该能在可利用 checkm8 的实体设备上实现。
不过在讨论它之前,先看看能否在 QEMU 和运行中的 Linux 内核上把功能跑起来。
Linux
首先启动一台可供实验的虚拟机:
$ pip install arm_now
$ arm_now start aarch64 --add-qemu-options='-gdb tcp::9000'
...
Welcome to arm_now
buildroot login:
接着用 Frida REPL 四处查看:
$ export FRIDA_BAREBONE_ADDRESS=127.0.0.1:9000
$ frida -D barebone -p 0
     ____
    / _  |   Frida 16.1.0 - A world-class dynamic instrumentation toolkit
   | (_| |
    > _  |   Commands:
   /_/ |_|       help      -> Displays the help system
   . . . .       object?   -> Display information about 'object'
   . . . .       exit/quit -> Exit
   . . . .
   . . . .   More info at https://frida.re/docs/home/
   . . . .
   . . . .   Connected to GDB Remote Stub (id=barebone)

[Remote::SystemSession ]-> Process.arch
"arm64"
[Remote::SystemSession ]-> Process.enumerateRanges('r-x')
[
    {
        "base": "0xffffff8008080000",
        "protection": "r-x",
        "size": 4259840
    }
]
[Remote::SystemSession ]-> $gdb.state
"stopped"
[Remote::SystemSession ]-> $gdb.exception
{
    "breakpoint": null,
    "signum": 2,
    "thread": {}
}
[Remote::SystemSession ]-> $gdb.exception.thread.readRegisters()
{
    "cpsr": 1610613189,
    "pc": "0xffffff8008096648",
    "sp": "0xffffff80085f3f10",
    "x0": "0x0",
    "x1": "0xffffff80085e6b78",
    "x10": "0x880",
    "x11": "0xffffffc00e877180",
    "x12": "0x0",
    "x13": "0xffffffc00ffe1f30",
    "x14": "0x0",
    "x15": "0xfffffff8",
    "x16": "0xffffffbeff000000",
    "x17": "0x0",
    "x18": "0xffffffc00ffe17e0",
    "x19": "0xffffff80085e0000",
    "x2": "0x40079f5000",
    "x20": "0xffffff80085f892c",
    "x21": "0xffffff80085f88a0",
    "x22": "0xffffff80085ffe80",
    "x23": "0xffffff80085ffe80",
    "x24": "0xffffff80085d5028",
    "x25": "0x0",
    "x26": "0x0",
    "x27": "0x0",
    "x28": "0x405a0018",
    "x29": "0xffffff80085f3f10",
    "x3": "0x30c",
    "x30": "0xffffff800808492c",
    "x4": "0x0",
    "x5": "0x40079f5000",
    "x6": "0x1",
    "x7": "0x1c0",
    "x8": "0x2",
    "x9": "0xffffff80085f3e80"
}
[Remote::SystemSession ]->
你可能想知道我们如何实现 Process.enumerateRanges()。目前这部分仅在 arm64 上实现,方式是解析页表。(如果连接 Corellium 的远程桩,我们会使用厂商特定的 monitor 命令,从而省去大量网络往返。)
既然已经能窥探运行中的内核,我们可能会想查找内部函数和数据结构。这正是内存扫描 API 的用武之地:
for (const r of Process.enumerateRanges('r-x')) {
  console.log(JSON.stringify(r, null, 2));
  const matches = Memory.scanSync(r.base, r.size,
      '7b2000f0 fa03082a 992480d2 : 1f00009f ffffffff 1f00e0ff');
  console.log('Matches:', JSON.stringify(matches, null, 2));
}
这里通过匹配前三条指令来寻找 Linux 内核的 arm64 系统调用处理程序。我们使用掩码功能忽略 ADRP 和 MOV 指令(第一条和第三条指令)的立即数。
来实际运行一下:
$ frida -D barebone -p 0 -l scan.js
     ____
    / _  |   Frida 16.1.0 - A world-class dynamic instrumentation toolkit
   | (_| |
    > _  |   Commands:
   /_/ |_|       help      -> Displays the help system
   . . . .       object?   -> Display information about 'object'
   . . . .       exit/quit -> Exit
   . . . .
   . . . .   More info at https://frida.re/docs/home/
   . . . .
   . . . .   Connected to GDB Remote Stub (id=barebone)
Attaching...
{
  "base": "0xffffff8008080000",
  "size": 4259840,
  "protection": "r-x"
}
Matches: [
  {
    "address": "0xffffff8008082f00",
    "size": 12
  }
]
[Remote::SystemSession ]->
现在我们已经动态检测到了内核内部的系统调用处理程序!🚀
重新实现内存扫描是我个人最喜欢的部分之一,@hsorbo 和我通过结对编程完成它,过程非常愉快。其思路与我们面向未越狱 iOS 的 Fruity 后端以及新的 Linux 注入器非常相似:无需把数据传回主机再搜索,只需传输搜索算法,让它在目标上运行。
内存扫描器实现使用 Rust 编写,也为本文稍后介绍的一项新功能奠定了基础。
现在知道 Linux 内核系统调用处理程序的位置后,就能用 Interceptor 安装指令级 Hook:
const el0Svc = ptr('0xffffff8008082f00');
Interceptor.attach(el0Svc, function (args) {
  const { context } = this;
  const scno = context.x8.toUInt32();
  console.log(`syscall! scno=${scno}`);
});
在运行中的虚拟机上试一试:
$ frida -D barebone -p 0 -l kernhook.js
     ____
    / _  |   Frida 16.1.0 - A world-class dynamic instrumentation toolkit
   | (_| |
    > _  |   Commands:
   /_/ |_|       help      -> Displays the help system
   . . . .       object?   -> Display information about 'object'
   . . . .       exit/quit -> Exit
   . . . .
   . . . .   More info at https://frida.re/docs/home/
   . . . .
   . . . .   Connected to GDB Remote Stub (id=barebone)

[Remote::SystemSession ]-> $gdb.continue()
[Remote::SystemSession ]-> syscall! scno=63
syscall! scno=64
syscall! scno=73
syscall! scno=63
syscall! scno=64
syscall! scno=73
syscall! scno=63
syscall! scno=64
syscall! scno=56
syscall! scno=62
syscall! scno=64
syscall! scno=57
syscall! scno=29
syscall! scno=134
...
就是这样——我们正在监控整个系统的系统调用!💥
Rust
尝试上面的示例时,你首先可能会注意到系统明显变慢。这是因为指定 JavaScript 函数作为回调时,Interceptor 会使用断点。
不过无需担心。如果用机器码编写回调并传入 NativePointer,Interceptor 会采用另一种策略:修改目标机器码,将执行流重定向到跳板,再由跳板调用我们指定地址处的函数。
这样很好,我们只需把机器码放进内存。有些人可能熟悉 CModule API。新的 Barebone 后端尚未实现它(最终会实现!),但我们有更棒的方案:RustModule:
const kernBase = ptr('0xffffff8008080000');
const procPidStatus = kernBase.add(0x15e600);

const m = new RustModule(`
#[no_mangle]
pub unsafe extern "C" fn hook(ic: &mut gum::InvocationContext) -> () {
    let regs = &mut ic.cpu_context;
    println!("proc_pid_status() was called with x0={:#x} x1={:#x}",
        regs.x[0],
        regs.x[1],
    );
}
`);

Interceptor.attach(procPidStatus, m.hook);
RustModule 使用假定已位于 PATH 中的本地 Rust 工具链,把提供的代码编译成自包含的 no_std ELF。它会重定位 ELF 并写入目标内存,同时解析 MMU 页表并插入新条目,使上传的代码成为虚拟地址空间的一部分,相关页面具有读、写、执行权限。
本例会在运行中的 Linux 内核里 Hook proc_pid_status()。
注意,可使用 File.readAllText(),避免在 JavaScript 中内联 Rust 代码。这里为了简洁采用内联代码。
现在来运行这个由 Rust 驱动的 Agent:
$ frida -D barebone -p 0 -l kernhook2.js
     ____
    / _  |   Frida 16.1.0 - A world-class dynamic instrumentation toolkit
   | (_| |
    > _  |   Commands:
   /_/ |_|       help      -> Displays the help system
   . . . .       object?   -> Display information about 'object'
   . . . .       exit/quit -> Exit
   . . . .
   . . . .   More info at https://frida.re/docs/home/
   . . . .
   . . . .   Connected to GDB Remote Stub (id=barebone)

Error: to enable this feature, set FRIDA_BAREBONE_HEAP_BASE to the physical base address to use, e.g. 0x48000000
    at <eval> (/home/oleavr/src/demo/kernhook2.js:13)
    at evaluate (native)
    at <anonymous> (/frida/repl-2.js:1)

[Remote::SystemSession ]->
糟糕!还没成功。新后端仍缺少一块拼图:我们还没有“内核桥接器”来自动识别已知内核的内部结构,以找到可用的合适内存分配器。实现 Process.enumerateModules() 等 API 也需要它,这样才能列出已加载的内核模块或 kext。我们还可以定位内核进程列表并实现 enumerate_processes(),让 frida-ps 工作。这些只是少数例子……还可以把 frida-gadget 注入用户空间进程;对于不想修改闪存的嵌入式系统,这会非常有用。话题扯远了 😊
因此,在 MCU 和未知内核上,如果要使用 RustModule、Interceptor 内联 Hook 模式、Memory.alloc() 等侵入式功能,就必须告诉 Frida 哪一段物理内存可以覆盖使用。
了解这一点后,再次尝试示例;这次设置 FRIDA_BAREBONE_HEAP_BASE 环境变量:
$ export FRIDA_BAREBONE_HEAP_BASE=0x48000000
$ frida -D barebone -p 0 -l kernhook2.js
     ____
    / _  |   Frida 16.1.0 - A world-class dynamic instrumentation toolkit
   | (_| |
    > _  |   Commands:
   /_/ |_|       help      -> Displays the help system
   . . . .       object?   -> Display information about 'object'
   . . . .       exit/quit -> Exit
   . . . .
   . . . .   More info at https://frida.re/docs/home/
   . . . .
   . . . .   Connected to GDB Remote Stub (id=barebone)

[Remote::SystemSession ]-> m
{
    "hook": "0xffffff80080103e0"
}
[Remote::SystemSession ]-> $gdb.continue()
成功了!🎉 现在在运行 QEMU 的终端中访问三次 /proc/$pid/status,让被 Hook 的函数得到调用:
# head -3 /proc/self/status
Name:	head
Umask:	0022
State:	R (running)
# head -3 /proc/self/status
Name:	head
Umask:	0022
State:	R (running)
# head -3 /proc/self/status
Name:	head
Umask:	0022
State:	R (running)
回到 REPL,应该能看到 hook() 被命中三次:
proc_pid_status() was called with x0=0xffffffc00d4bca00 x1=0xffffff8008608758
proc_pid_status() was called with x0=0xffffffc00d4bc780 x1=0xffffff8008608758
proc_pid_status() was called with x0=0xffffffc00d4bc780 x1=0xffffff8008608758
成功了!🥳
不过有一点很重要:示例使用了 println!(),它实际上会让目标命中断点,以便主机读出传递的消息,并像 JavaScript 的 console.log() 一样向上传递。因此这个功能只应临时用于调试;若处在热点代码路径上,还应限制调用频率。
接下来你可能想把外部符号传入 RustModule,例如从 Rust 代码调用内核内部函数。可按下面的方式声明:
extern "C" {
    fn frobnicate(data: *const u8, len: usize);
}
然后在构造 RustModule 时通过第二个参数传入:
const m = new RustModule(source, {
  frobnicate: ptr('0xffffff8008084320'),
});
熟悉 CModule API 的读者会发现,这部分完全相同。还可使用 NativeCallback 在主机端用 JavaScript 实现部分逻辑,但需要谨慎处理,以免形成性能瓶颈。反过来,也可使用 NativeFunction 从 JavaScript 调用 Rust 代码。
最后,你可能还想从 crates.io 导入现有 Rust crate。这同样受支持:
const m = new RustModule(source, {}, {
  dependencies: [
    'cstr_core = { version = "0.2.6", default-features = false }',
  ]
});
Corellium
令人兴奋的是,上述所有 Linux 功能在 Corellium 上也能直接工作。只需将 FRIDA_BAREBONE_ADDRESS 指向 Corellium 界面中“Advanced Options”→“gdb”显示的端点。
感谢 Corellium 团队在此过程中的支持。他们甚至实现了新的协议功能来提升互操作性 🔥
未来
目前这个新后端仍应视为 alpha 质量,但它已经能完成许多有用的事情,继续让它留在分支里实在可惜。
你可能会注意到,目前实现的 JS API 只是一个子集,而且非 arm64 目标还不能使用所有功能。随着后端成熟,这些都会逐步改善。(非常欢迎提交 Pull Request!)
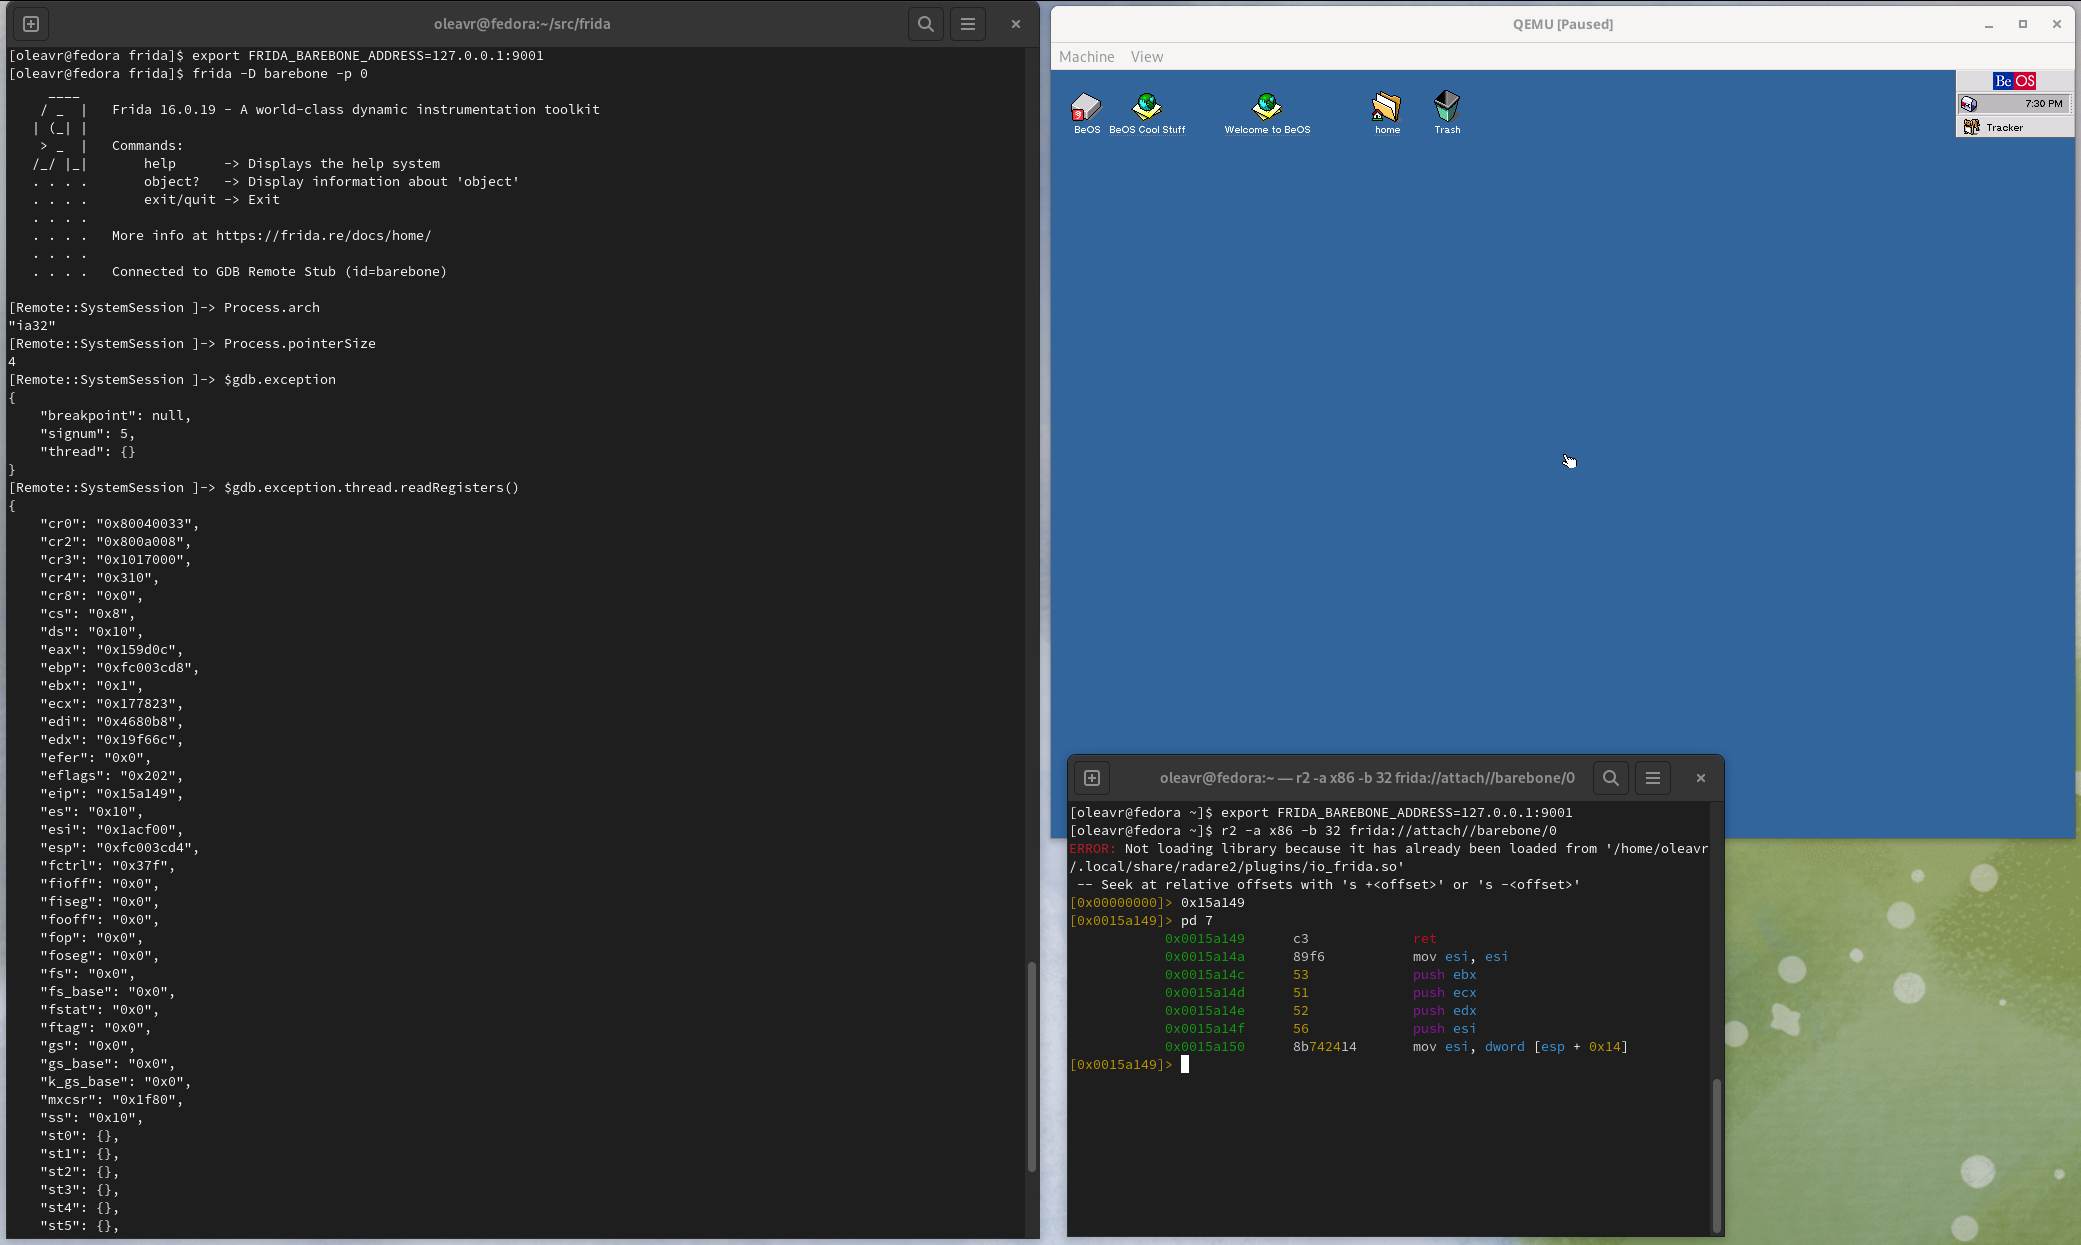
再分享一个有趣的例子:这是 Frida 附加到 BeOS 内核的画面:
结语
此外还有许多令人兴奋的变化,请务必查看下面的变更日志。
尽情体验吧!
变更日志
- 新增 Barebone 后端。(上文已详细介绍。)
- objc:处理修饰符,使类型解析更可靠,特别是在处理经常带有“atomic”修饰符的 ivar 时;此前修饰符会被视为未知类型并抛出异常。感谢 @mrmacete!
- android:修复 Android 14 支持。感谢 @gsingh93!也感谢 @jayluxferro 修复我合并 @gsingh93 的 PR 时犯下的错误。
- gum-graft:新增链式导入支持。感谢 @mrmacete!
- gumjs:新增 NativePointer#readVolatile(),可安全读取可能在途中被取消映射或改变内存保护的内存。感谢 @hsorbo!
- darwin:改进 tvOS 支持,使其覆盖 frida-server。感谢 @tmm1!
- darwin:修复后备 kill() 逻辑中的内存泄漏。感谢 @tmm1!
- fruity:处理获取 dyld 符号失败的情况。
- compiler:将 frida-compile 升级到 16.2.2;现在也会打包依赖项的 source map。感谢 @vfsfitvnm!
- compiler:将 @types/frida-gum 升级到 18.3.2,并改进 hexdump() 的类型定义。
- gdb:从 Fruity 的 LLDB.Client 中提取核心实现,新增 GDB.Client,并加入多项协议增强和互操作性修复。
- elf-module:改进 API 并实现跨平台;支持从 blob 加载、公开重定位信息,并提升整体稳健性。
- capstone:修复使用 MSVC 构建时 x86 上的崩溃。